Authentic Thai Recipe for
Thai Roasted Chili Sauce
Authentic Thai Recipe for
Thai Roasted Chili Sauce
น้ำพริกเผา (Nam Prik Pao)
Currently rated: ![]()
Rated 4.5 Stars from 5849 reader reviews
First published on December 1, 2013
Recipe by W. Tipsuwan
Yield: About 1/2 Cup
Prep time: 30 - 45 Minutes
Ready in: About 1 hour
Ingredient List:
- About 10 - 12 Sun Dried Thai Chilies
- About 20 - 25 Sun Dried Thai Hot Chilies
- 4 - 5 Red Shallots
- 3 - 4 Large Gloves Garlic
- 1/2 Tablespoon Thai shrimp paste
- 1 Tablespoon Tamarind Fruit
- 1/2 Tablespoon Salt
- 1/2 Cup Coconut Sugar
- 2 Tablespoons Fish Sauce
- 1/2 Cup Water
- 1/2 Cup Vegetable Oil
About my Nam Prik Pao:
About my Nam Prik Pao:
Nam Prik Pao (Roasted Chili Paste) is a Thai chili paste made with 2 kinds of chilies, garlic, shallots, tamarind, and shrimp paste. The ingredients are roasted before blending, giving recipes a rich combination of smokey, spicy, and sweet flavors. This delicious paste is used to add flavor to foods.
Nam Prik Pao is often used to flavor Tom Yum Goong (Spicy and Sour Soup with Shrimp). It's what gives it the spicy and smokey flavor and delicious orange color.
Check out our recipe for Pat Prik Pao Mu Grob, a delicious stir-fried main dish using deep-fried pork belly. Prik Pao one of my favorite traditional Thai tastes, and I'm happy to show you how it's made.
Step by Step Directions:
Step by Step Directions:
How to Make Nam Prik Pao
How to Make Nam Prik Pao
Step 1
Assemble the ingredients, then heat a large wok or non-stick frying pan over medium to high heat. Pan should be quite warm before you begin roasting the ingredients.

Step 1
Roasting.
Spread the large chilies out in your wok so that they are all getting direct heat. As they start to heat up, you'll hear them crackling and popping. You want to let them start to brown, and even burn a little. I like to have mine about 25% burned. The burned, black part of the roasted chilies is what gives the chili paste it's smokey flavor. Remove them and set aside, wipe any residue from the pan, then do the same with the small chilies.

Step 1
Add the whole unpeeled shallots and garlic gloves to the hot pan. You want to let them cook for a few minutes so that they start to soften up a little inside. The shells will get a little burned. When they're nice and toasted, remove them and set aside to cool. Wipe out the pan before you go to the next step.

Step 1
Shrimp paste directly from the can is very moist and sticky. What you need to do for this recipe is cook it a little. Cooking it changes the taste and adds to the overall smokey flavor of the finished chili paste. Take the shrimp paste and flatten it in your fingers until it forms a nice little pancake shape. Place it on a folded piece of aluminum foil (to prevent sticking), and then lay it in the wok to cook. After a couple of minutes it will be dry and crumbling, and a little browned. Remove it from your wok and set it aside to cool.

Step 1
Grinding and Mixing.
After the garlic and shallots have cooled down enough to touch, remove all the burned shells and skin. Then, using a food processor, a grinder, or a mortar and pestle, grind up the chilies until they look like the ground chili you can buy. The seeds should still be intact, so not too fine. You should have about 1/2 cup of each kind of ground chili.

Step 1
Mixing the ingredients together should be done with a mortar and pestle. You can use a food processor, be they tend to cut everything to one size, and you just won't get the same blending of flavors as you would by crushing them and squeezing the juices together.
Put the shallots, garlic, shrimp paste, and tamarind into the pestle, and mash together until smooth and creamy.

Step 1
Add the chilies and salt to the mashed mixture, and pound with the mortar until everything is well blended and has a consistent texture all the way through.

Step 1
When the paste is well mixed and getting hard and sticky, you can remove it from the pestle and roll it into a ball.
Note: We keep a good quantity of this raw paste on hand in the refrigerator so we can easily cook it the rest of the way as needed for the table.

Step 1
Cooking. Heat the vegetable oil in a shallow skillet or pan over a low to medium flame. Break up the ball of raw paste and add it to the heated oil. Push it and mash it into the oil until it start to loosen up and become a thin, oily paste.

Step 1
Let it get hot, then reduce the flame and fry slowly for about 5 minutes to soften all of the bits of chili, etc.

Step 1
Add in the fish sauce, water, and sugar. Stir it up, let it get hot again, then cook slowly until the sugar all melts. Continue stirring so it doesn't burn, keeping the flame low so it's just bubbling a little.

Step 1
After the sugar is all melted, let it cook slowly for about another couple of minutes. Then remove from the heat and let it cool. The paste should be thin and oily, and the oil will be sitting on top.

Step 1
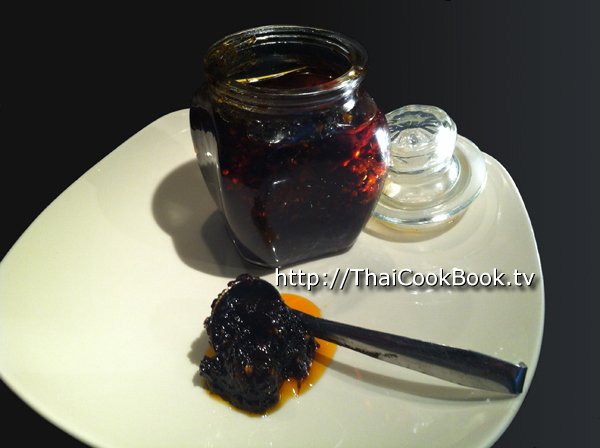
Pour the paste into a bowl to let it cool all the way, then transfer to a jar or other closed container. You can keep this in the refrigerator for several months. However, always serve at room temperature so it's soft, oily, and sticky.

Step 1
This has been a lot of work, so why not treat yourself to a little now? I like to use Nam Prik Pao to flavor brown rice, and some cool cucumber slices on the side is the perfect complement. As a condiment, Thai Roasted Chili Paste should be used sparingly. Contrary to what you may have heard, Nam Prik Pao should not be too spicy. "Pao" in this case means roasted or barbequed, not "Burn", as in so hot you can't eat it. It should have a delicious sweet taste from the sugar and tamarind, followed by subtle smoky, herbaceous, and spicy flavors. Be careful, this stuff is addictive.

Watch the Complete Video Lesson: